Examples
Here you will find some examples on how each element is being displayed on EzGitDoc page and how generated code looks in *.md file. Most of them are generated in HTML tags but not all like text list, table. Currently there are no plans on separating those approaches as with raw markdown you cannot for example set image width/height or align it.
1. Code
- EzGitDoc
- Preview
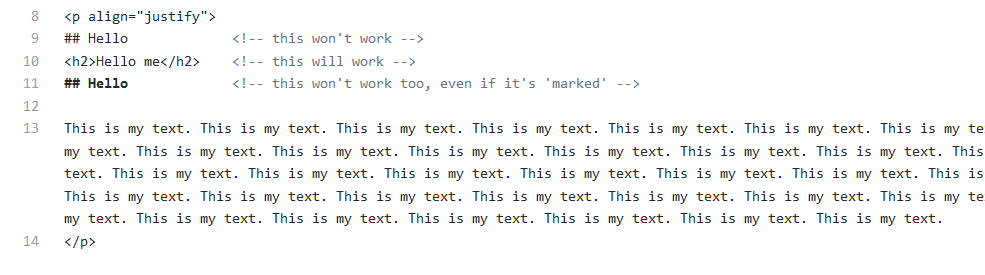
2. Header
note
EzGitDoc is using <h> tags to create headers. It's also possible to use hashtag markdown. HTML tags are 'slightly better' due to the fact that they can be used inside other HTML tags like paragraphs while hashtags not.
- EzGitDoc
- Preview
3. Image
note
If you didn't prepare images yet, leave word blank in URL field and EzGitDoc will use placeholder images which can be overwritten when needed.
- EzGitDoc
- Preview
Example image from: pixabay.com
4. Link
note
If you want to align single link(center/right), wrap it inside paragraph and use align attribute.
- EzGitDoc
- Preview
5. List
5.1. Iconic
note
By adding extra linebreak before description, you can put it's text below title.
- EzGitDoc
- Preview
5.2. Normal
- EzGitDoc
- Preview
5.3. Link
- EzGitDoc
- Preview
6. Table
6.1 Text
- EzGitDoc
- Preview
6.2 Image
- EzGitDoc
- Preview
6.3 Kbd / Linked Kbd
note
Use kbd table to display images and when someone click's them they will appear in fullscreen. Linked kbd can be useful if you want to redirect user to repository or different page.
- EzGitDoc
- Preview
Difference between kbd and linked kbd
kbd single element
linked kbd single element
7. Text
note
In the text element you can use HTML tags to extend it like anchor(a), header(h), emphasis(em) etc.
- EzGitDoc
- Preview
8. Badge
note
Labels are great to give short information. EzGitDoc allows to make static badges but you can make dynamic ones by yourself or use predefined. Visit Shields.io to learn more.
note
To give between badges some space you can use for e.g. HTML character code (result shown in fixed preview tab) or linebreaks(br).
- EzGitDoc
- Preview
- Fixed Preview
9. Details
note
Details-summary is handy element to make documentation more compact by hiding specific problems or explanations under title which then can be expanded by user to see details.
- EzGitDoc
- Preview